If you’re paying $9.99 a month for Apple Music, but refuse to incur more costs by using up your data plan, check this out. The following instructions shows iPhone, iPad, and Mac lovers how to download music to their device in order to enjoy it offline.
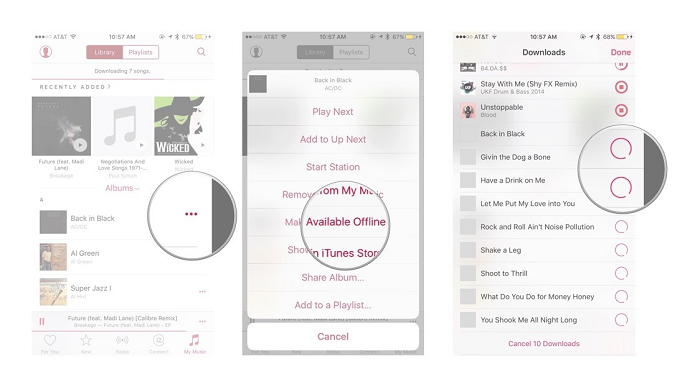
1. Launch the Music app from your Home screen.
2. Go to the song or album you want to download.
3. Tap the More button (looks like •••) to the right of the music.
4. Tap on Make Available Offline.
To add a playlist to your local library for offline listening, follow these steps:
1. Launch the Music app on your iPhone or iPad.
2. Go to the playlist you want to download.
3. Tap the More button (looks like •••) to the right of the music.
4. Tap on Make Available Offline
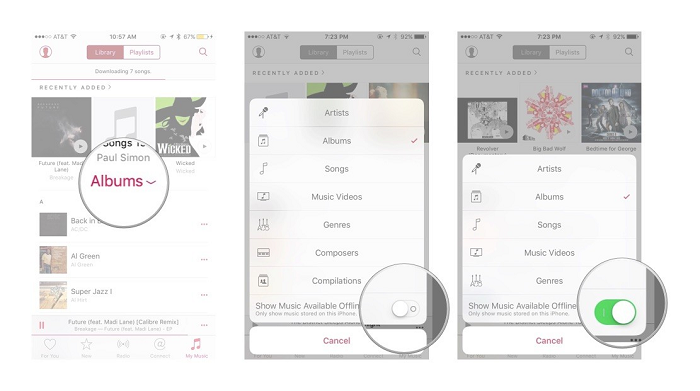
The playlist/songs should immediately begin downloading to your device. Check your local playlists to see the downloads. In order to do this, follow these steps:
1. Launch the Music app from your Home screen.
2. Tap on the My Music tab.
3. Select the view type dropdown (by default, it reads “Albums”) from the middle of the screen.
4. Switch Show Music Available Offline to on at the bottom of the pop-up.
 To change this, tap the dropdown again and turn the Show Music Available Offline switch off.
If you’ve downloaded entire albums or playlists, you can confirm this by spotting a small grey iPhone icon in the top right hand corner. When you’re ready to remove the downloaded music from your phone or iPad, find out how by visiting imore.com for more details.


